Usage Guide
Version 1.2.0
Layout Grid Calculator plug-in for Adobe InDesign CC help you create a perfect typographic grid in no time. Either for a new design or to refine an existing one, the realization of such a grid requires expertise and a lot of calculation, but in a few clicks, with the LGC you can have a perfect grid where all the components of the typographic grid system (document grid, lead, reference grid, margins and gutters) correlates to each other perfectly.
Compatibility
Version 1.1.0. – InDesign CC 2018 and later
MacOS and Windows
How to Install
The Layout Grid Calculator plug-in can only be installed via the Adobe Exchange customer portal. Sign in to the Adobe Exchange portal to install your extension. When file synchronization is enabled, purchased add-ons will automatically sync with the Creative Cloud account and will available in Adobe InDesign. If you cannot install your extension using the Adobe CC Desktop application, please follow the instructions on the Adobe Exchange portal to install the plug-in using an extension install utility or command line.
Using the Layout Grid Calculator
Launching the LGC panel
The Layout Grid Calculator panel can be accessed in Window > Extensions > Layout Grid Calculator.

Figure 1. Waning dialog box at launch.
A warning dialog box appears each time the LGC panel is launched, (Figure 1). It warns you that changes will be made to the open document and that all grid and guide settings that were not created using the LGC will be overwritten.
When the panel is launched it checks the existence of LGC settings, if LGC settings are found, the panel extracts this information and displays it without making any changes to the actual configuration of the open document. But if it does not find any existing LGC settings, the panel analyzes the open document, and adjusts it according to the panel’s presets. Click OK to continue and make changes or Cancel to apply no modification to your document and in this case the LGC will not be launched.
Works on Master pages only

Figure 2. Opening instructions.
The LGC only works on the master pages. So when you launch the LGC panel, it automatically displays the master page on the pasteboard so you can start configuring your grid. Changes made using the panel will be applied to the entire selected master spread (See section: Mixing Modular and Multicolum for more possibilities).
Workspace overview
Three configuration modes
The Layout Grid Calculator panel consists of three configuration modes, the Modular, Column and Manuscript modes, which are three calculation methods of configuring the typographic grid. Choose a method according to your publication type or page format. Some modes work best for small formats, others for long text, etc.
The Modular and the Multicolumn modes can be used simultaneously in the same document (See section: Mixing Modular and Multicolum).
Modular
Multicolumn
Manuscript
…
The Panel workspace
A. Top section (Document) The Document section is where you set the document size page and desired leading and font size. All calculation will be based on these informations. This is common in all three modes.
B. Middle section (Margins) The Margins section is the heart of the panel. It consists of three control tabs, the Modular, Column and Manuscript control tabs which are three method of setting up grids. Choose the one that best suits your goal.
C. Bottom section (More) The bottom section of the panel contains options that control the Document grid and the Baseline grid.
Recommended Workflow
Below is the recommended workflow for using the Layout Grid Calculator:
1. Create a document in InDesign
- Choose File > New > Document. Choose your document size.
2. Decide on the font size and leading of your body text
- Create a text frame using the type tool.
- Add placeholder text by choosing Type > Fill with Placeholder Text.
- Select the text box, change the value of the font size in the Properties panel to your choice.
- Change the Leading value to adjust the spacing between lines of text.
- When you are happy with it, move to the next step.
3. Launch the Layout Grid Calculator panel
- Choose Window > Extensions > Layout Grid Calculator.
4. Configure the LGC panel (Document section)
- The first step when configuring the panel is to insert the value chosen for the body text font size (from step 2) in the Size field of the LGC panel.
- The second step is to also insert the value chosen for the leading (from step 2) in the Leading field of the LGC panel.
5. Apply the ‘LGC Paragraph Style’ (Optional)
- If the above step has been followed, you will find a paragraph text style named ‘LGC Paragraph Style’ in the Properties panel.
- Apply the style by inserting the cursor in a text and select the LGC paragraph style.
- When this is done, updating the font size and leading in the LGC panel will update all text with that same style applied.
- Important! Be very careful when modifying this style manually, as the font size, the leading and ‘Align to grid’ value get overwritten when updating settings of the LGC panel.
6. Configure the LGC panel (Margin section)
- You can now use the Margin section to set up the columns, rows, margins, gutters etc. (see next section).
7. The LGC panel can be closed and reopened without loosing the settings
- A document created using LGC can be shared and reopened without the plug-in installed, it can also be exported to IDML format.
- An IDML file that is reopened will lose its LGC editing capabilities but will retain its grid settings. We recommend that you do not reuse the LGC with an IDML file, because some parameters will be ignored and replaced.
Modular mode
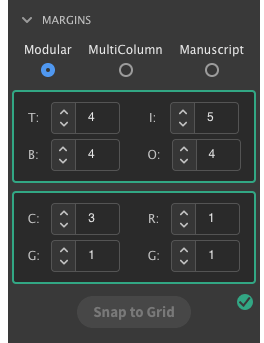
The Modular mode works well for any type of publication, small size and large i.e. Business cards, flyers, etc.

T Top margin
B Bottom margin
I Inside margin
O Outside margin
C Number of columns
R Number of rows
G Gutters
Snap to grid button
When the columns and rows do not match the document grid, the panel alerts you by turning red and displays a warning sign. Click on the Snap to grid button to automatically align all elements to the document grid.
Note: When you choose to automatically correct the alignment, the number of columns and the width of the gutters remain unchanged, only the margins are readjusted by prioritizing the bottom and inner margins.
Multicolumn mode
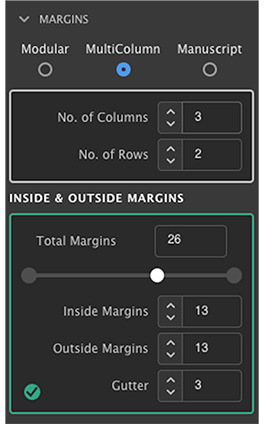
The Multicolumn mode works well when a specific number of columns is needed i.e magazines, newspaper etc. The first step when using the Multicolumn control panel is to choose the desired number of columns and rows (A). The calculator then returns the options available for the interior and exterior margins in terms of grid lines (B. > Total Margins).
The second step is then to decide the number of grid lines that will be allocated to the outer and inner margins using the slider (B). The LGC will distribute the number of grid lines more or less evenly between the margins.
Increase or decrease the value of the outside and inside margins to allocate more or less grid lines to the inner or outer margin.
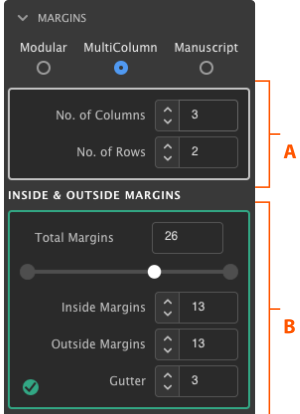
Figure 8. Multicolumn control tab.
Total Margins Total number of grid lines assigned to margins.
Slider Increase or decrease the total number of grid lines allocated to margins.
Inside Margins Specify the number of grid lines for the interior margins.
Outside Margins Specify the number of grid lines for the outer margins.
Mixing Modular and Multicolum
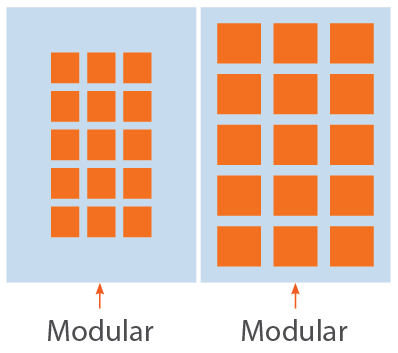

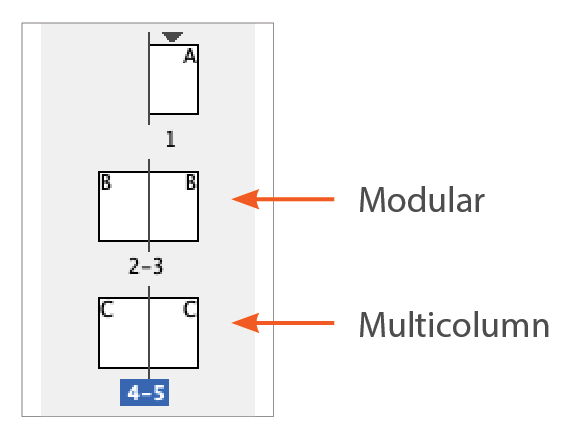
To create a spread composed of pages with different layout configurations (Figure 11), work with single master pages created from scratch. Then place them side by side in the document page section.
In document spread It is also possible to have pages, which have been configured using different modes (Figure 12), to face each other on the same document spread. The process is the same as above.
In master spread You can create master spreads containing pages created with two different configuration modes (Figure 14). To do this, create two single master pages, configure them using the LGC, then close the LGC panel, create a new master spread (Important: Do not use A-master) then place the single master pages side by side on the newly created master spread. You are done! You can now relaunch the LGC panel.
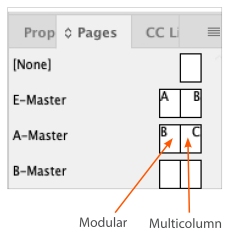
Figure 14. Mix of different types of grid on master spread.
Manuscript mode
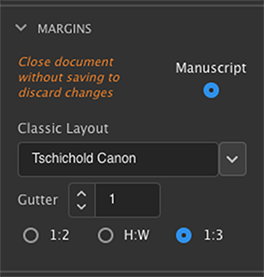
Use the Manuscript mode to create a harmonious and pleasant grid layout that uses the classic canons of page construction. This mode is mainly use for the layout of long text documents, i.e. books, long essays etc.
Note that this mode works on its own and cannot be mixed with the other modes unlike the Modular and Multicolumn modes. It uses a different calculation method to determine the document grid. Best practice is to start from scratch .
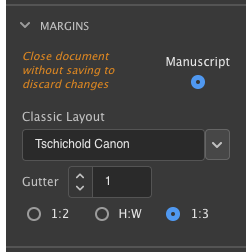
Figure 15. Manuscript mode’s control panel.

Figure 16. Manuscript mode’s warning window.
When you switch to this mode, the panel opens a window warning you that the panel will assign new settings to all the pages of the document (Figure 10). The panel overwrites the parameters of all pages, including the master pages. The existing configuration will no longer be usable. The panel will create a new master page to use and all the previous settings will be lost and the effect is irreversible. We therefore advise you to save your document before proceeding to this mode.
FAQ
How many computers can I install the plug-in?
One purchase entitles you to two (2) license keys, which can be used on two computers simultaneously.
Is there a possibility to increase the number of seats to more than 2?
Yes, if you need more seats, you can contact us and we will increase your number of seats for an additional fee.
Can the plug-in be deactivated then reactivated on another computer?
Yes, the plugin uses a floating license system, which means that you can use it on 2 computers simultaneously and on an unlimited number of computers.
Troubleshooting
Error message: “The license associated with this plugin is invalid“
- Go to the “Document” folder.
- On Mac: make invisible files visible (Shift + Command + dot)
- Change the name of the LGC folder, for example by adding a letter at the end of the name.
- Restart the LGC plugin
- Insert the login information
Error message: “Could not find your computer’s serial number“, do one of the following:
- Disable firewall during installation
- Allow firewall to access Adobe folder:
Windows: C:\program files\common files\adobe\cep\extensions
Mac: /Library/Application Support/Adobe/CEP/extensions - or change network
Error message: “License key has reached maximum activation count“
- Please contact: mailme@tikuto.com
EULA
The following license agreement applies to you. By installing, copying or otherwise using the aforementioned software product, you agree to be bound by the terms of the following software license agreement. This is a legal agreement between you (either an individual or an entity) and Ti’kuto Ltd (C08079036). By installing, copying or otherwise using any part of the “Layout Grid Calculator v1 (LGCv1)”, you agree to be bound by the terms of this Agreement. If you do not agree to the terms of this Agreement, promptly delete the LGCv1 and accompanying items (including printed materials and binders or other containers) in their entirety.
1. GRANT OF LICENSE.
Ti’kuto Ltd grants you a nonexclusive, non-transferable perpetual license to use the LGCv1 and any documentation for your purposes, subject to the terms of this Agreement. You may NOT distribute any part of the LGCv1 as a part of any package which is offered in any way on the open market whether for sale or free of charge. You expressly understand and agree that you are contracting solely with Ti’kuto Ltd, for the use of the LGCv1 and not with any subsidiary or other affiliated entity of Ti’kuto Ltd, and all obligations of Licensor hereunder are solely of Ti’kuto Ltd.
2. COPYRIGHT.
The Software is owned by Ti’kuto Ltd and is protected by Mauritian copyright laws and international treaty provisions. Therefore, you must treat the Software like any other copyrighted material (e.g. a book or musical recording) except that you may either (a) make one copy of the Software solely for backup or archival purposes, or (b) transfer the Software to a single hard disk provided you keep the original solely for backup or archival purposes. You may not copy the user documentation provided with the Software, except for your authorised use
3. OTHER RESTRICTIONS.
This License is your proof of license to exercise the rights granted herein and must be retained by you. You may not rent or lease the Software, you may not reverse engineer, decompile, or disassemble the Software, except to the extent that the foregoing restriction is expressly prohibited by applicable law.
4. UPDATES.
Updates are freely available. Updates will, upon installation, automatically become subject to this agreement. “Update” means a bug fix, patch, or other revision to or modification of the software that Ti’kuto Ltd provides. “Updates” do not include “Upgrades”. An update is identified by a change in a number to the right of the first decimal point in the product’s version number. “Upgrade” means a major release of the software, as determined by Ti’kuto Ltd in its sole discretion. A major release is identified by a new number to the left of the first decimal point in the version number of the product name. This purchase does not entitle you to any upgrades.
5. ACTIVATIONS.
A purchase grants you two(2) single-use licenses. An activation is node-locked which means a license is associated with the computer it is activated on and cannot be transferred. A license has a maximum of one(1) activation – once activated, a license cannot be used again. When activating your license, the serial number of your computer is sent to our servers and the cryptographic key is generated based on the serial number. We only store the hashed key and do not store the serial number of your computer.
6. LIMITED WARRANTY.
Ti’kuto Ltd warrants that (a) the Software will perform substantially in accordance with the user documentation for a period of thirty (30) days from the date of receipt. Any implied warranties on the Software are limited to thirty (30) days. Some states/jurisdictions do not allow limitations on the duration on an implied warranty, so the above limitation may not apply to you. This limited warranty is void if failure of the Software has resulted from accident, abuse or misapplication.
7. CUSTOMER REMEDIES.
This limited warranty is void if failure of the Software has resulted from accident, abuse, or misapplication. Any replacement Software will be warranted for the remainder of the original warranty period or thirty (30) days, whichever is longer.
8. NO OTHER WARRANTIES.
Ti’kuto Ltd does not warrant the functions contained in the software will meet your requirements or that the operation of the software will be uninterrupted or error-free. The entire risk as to the quality and performance of the software is with you. To the maximum extent permitted by applicable law, Ti’kuto Ltd and its suppliers disclaim all other warranties, either express or implied, including, but not limited to, implied warranties of merchantability and fitness for a particular purpose, with regard to the software and the accompanying written materials. This limited warranty gives you specific legal rights. You may have others which vary from state/jurisdiction to state/jurisdiction.
9. NO LIABILITY FOR CONSEQUENTIAL DAMAGES.
To the maximum extent permitted by applicable law, in no event shall Ti’kuto Ltd or its suppliers be liable for any damages whatsoever (including without limitation, damages for loss of business profits, business interruption, loss of business information, or any other pecuniary loss) arising out of the use or inability to use the LGCv1, even if Ti’kuto Ltd has been advised of the possibility of such damages. Because some states/jurisdictions do not allow the exclusion or limitation of liability for consequential or incidental damages, the above limitation may not apply to you.
Team
Project Developer:
Jean-Lou Désiré
mailme@tikuto.com
Software Developer:
Rahul Thakoor
developer@tikuto.com